이 매뉴얼은 JK전자(JK Electronics) 에 의해서 번역, 수정, 작성 되었고 소유권 또한
JK전자(JK Electronics)의 것입니다. 소유권자의 허가를 받지 않고 무단으로 수정, 삭제하거나 배포 할 수 없습니다.
S5PV210 SDK 개발보드 OS Porting guide
* Update history
- 2012.2.23 : 초기 Release
1. Boot from SD memory
2. OS Install
2.1 Linux System install to NAND flash
2.2 Android 2.3 System install to NAND flash
2.3 Android 4.0 System install to NAND flash
2.4 Windows CE 6.0 install to NAND flash
3. Configuration FriendlyARM.ini
1. Boot from SD memory
S3C6410은 SD 메모리 카드를 이용해서 부팅을 할 수가 있는데, 그러기 위해서는 Windows PC에서 Bootloader를 SD 메모리에 퓨징 해야 합니다. SD메모리에 퓨징을 한다는 의미는 그냥 파일을 복사하는 방식이 아니라 삼성에서 제공하는 "IROM_SD_Fusing_tool.exe" 프로그램을 이용해서 SD메모리에 부트로더를 퓨징 한다는 의미 입니다. SD메모리에 퓨징을 해도 SD메모리 상에는 어떤 파일도 보이지는 않습니다. 그리고 "SD-Flasher.exe" 또한 SD퓨징 툴로 삼성에서 제공하는 기본 프로그램에서 조금더 개선한 SD퓨징 툴 입니다. 그 차이점은 아래 표를 참조하시기 바랍니다.| 비교 | IROM_SD_Fusing_tool.exe | SD-Flasher.exe |
| 지원 OS | Only supported Windows XP | Can support WindowsXP/Vista/Windows7 |
| 지원하는 SD메모리 | High speed SD 카드를 지원하는 버젼의 툴 사용시 선택적 지원 | High speed SD와 일반 SD카드 모두 지원 |
| Auto Scan SD Card | SD메모리 드라이브를 사용자가 선택 해야 함 | SD메모리 드라이브 자동 스캔 |
1.1 Programming bootloader to the SD
card
1.1.1 Bootloader Introduction
* U-Boot삼성전자의 S3C6410 USB 다운로드 기능을 지원하는데, 우리는 여기에서 좀더 개선된 기능을 가진 모든 소스를 공개한 USB다운로드를 제공합니다.
(1) 좀더 개선되고 다양해진 다운로드 메뉴
(2) SD card boot configuration 개선
(3) yaffs2 파일시스템을 리눅스 부팅없이 바로 다운로드 가능
(4) Windows CE를 위한 Nboot 다운로드 기능 지원
(5) Windows CE OS이미지(NK.bin) 다운로드 지원
(6) Support original shell
주의 : 삼성전자의 U-Boot는 현재 SDHC card (more than 2G's High-capacity SD cards) 를 지원하지 못합니디. 그래서 2GB이하의 SD메모리를 사용해야 합니다.
1.1.1 Bootloader programming based on WindowsXP
SD메모리 카드 이용시 몇몇 노트북이나 데스크탑에 있는 메모리 리더기를 사용하지 마세요. 반드시 USB SD메모리 리더기를 사용하셔야 합니다.모드 SD메모리에서 다 잘 동작하는것은 아닙니다. 이미 테스트가 완료된 메모리 카드는 SanDisk 4GB, SanDisk 2GB, Tohshiba 4GB 메모리에서 테스트 하였습니다.
추가적으로 SD-Flasher.exe 는 메모리 카드의 맨 앞부분의 130MB를 삭제하고 분할 합니다. 그래서 256MB이하의 SD 메모리는 사용 할 수가 없고 2GB메모리이상의 카드를 권장 합니다. 그리고 "SD-Flasher.exe" 프로그램을 실행하기 전에 미리 FAT32로 SD메모리를 포맷 한 다음 실행해야 합니다.
Step1: CD/tools/SD-Flasher.exe 실행
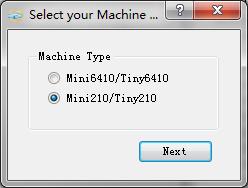
위의 화면에서 210을 선택 합니다.
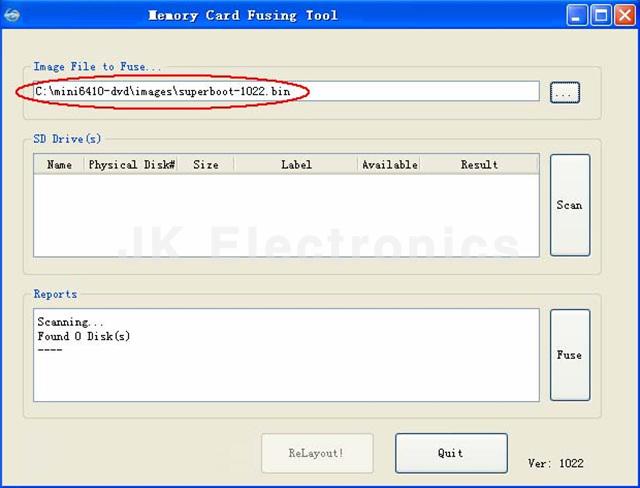
Step2: Locations button
CD/images/Superboot210.bin 파일을 선택 합니다. 아래 그림은 6410 개발보드 예시입니다. 210에서는 받드시 CD/images/Superboot210.bin 파일을 선택 해야 합니다.
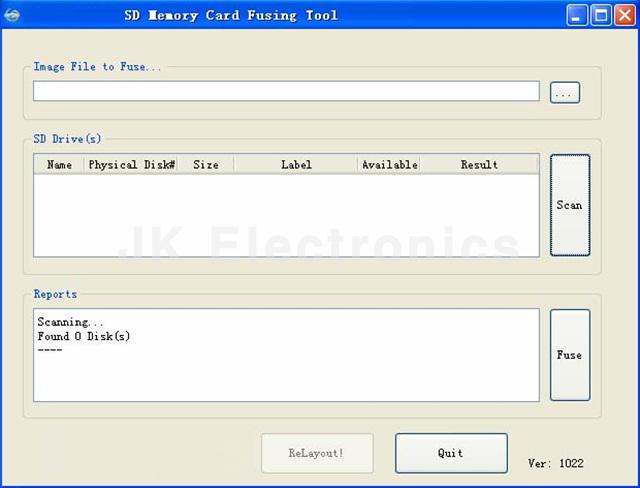
Step3. FAT32으로 포맷된 SD메모리를 USB 메모리 리더기를 통해서 PC연결 한 후 "Scan" 버튼을 누르면 자동으로 SD 메모리 드리이브를 찾아서 보여 줍니다.
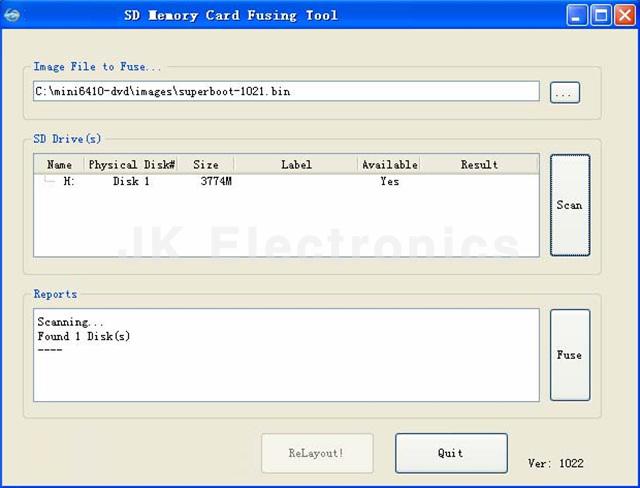
Step4. 그리고 나서 "Fuse" 버튼을 누르면 superboot 가 SD 메모리에 Write 됩니다.
Superboot가 SD메모리에 잘 Write되었는지 확인하는 방법은 개발보드의 Switch2를 SDBOO모드로 설정하고 전원을 인가 했을때 개발보드의 LED1이 깜빡이면 정상적으로 동작하는 것입니다. 만약 LED1이 깜빡이지 않거나 Serial포트로 어떤 내용도 출력되지 않는다면 SD메모리에 Superboot가 제대로 Write되지 않은 것입니다. 이런 경우에는 위의 Step1 ~ 4가 제대로 이루어 졌는지 확인한 후 진행해야 합니다.
1.1.1 Bootloader programming based on Windows7
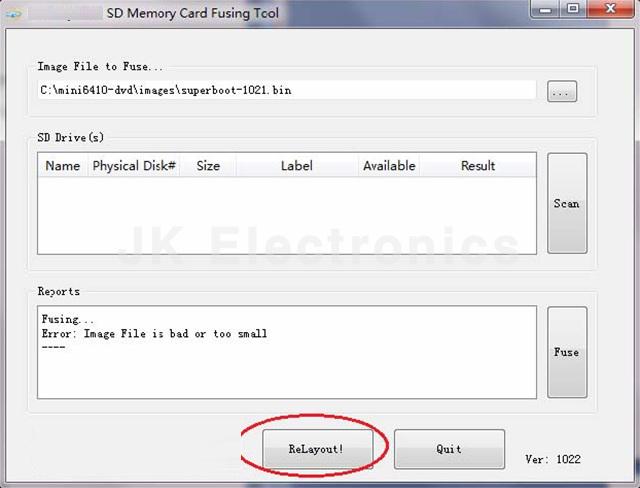
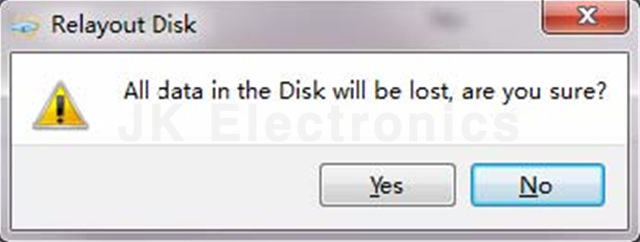
Windows Xp와 마찬가지로 SD메모리 카드 이용시 몇몇 노트북이나 데스크탑에 있는 메모리 리더기를 사용하지 마세요. 반드시 USB SD메모리 리더기를 사용하셔야 합니다. 추가적으로 SD-Flasher.exe 는 메모리 카드의 맨 앞부분의 130MB를 삭제하고 분할 합니다. 그래서 256MB이하의 SD 메모리는 사용 할 수가 없고 2GB메모리 카드를 권장 합니다.Step1: CD/tools/SD-Flasher.exe 를 관리자 권한으로 실행하고 "ReLayout" 버튼을 클릭해서 SD 메모리 카드의 영역을 분할 합니다.
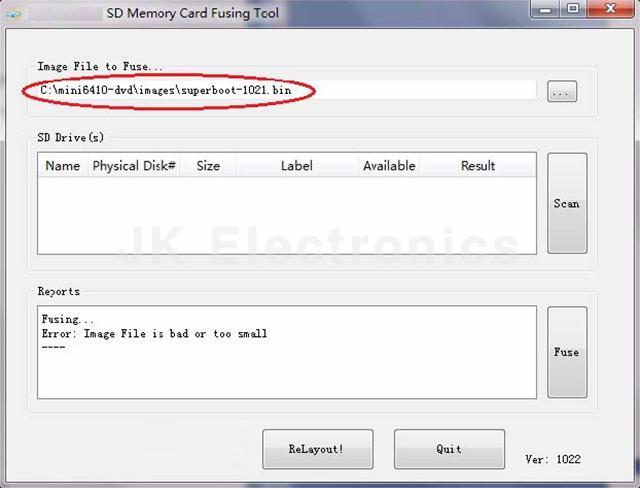
Step2: Locations button
CD/images/Superboot210.bin 파일을 선택 합니다. 아래 그림은 6410 개발보드 예시입니다. 210에서는 받드시 CD/images/Superboot210.bin 파일을 선택 해야 합니다.
Step3. FAT32으로 포맷된 SD메모리를 USB 메모리 리더기를 통해서 PC연결 한 후 "Scan" 버튼을 누르면 자동으로 SD 메모리 드리이브를 찾아서 보여 줍니다. 그리고 아래와 같이 "Available" 이 "No"로 된 SD메모리 카드는 사용 하실 수 없습니다.
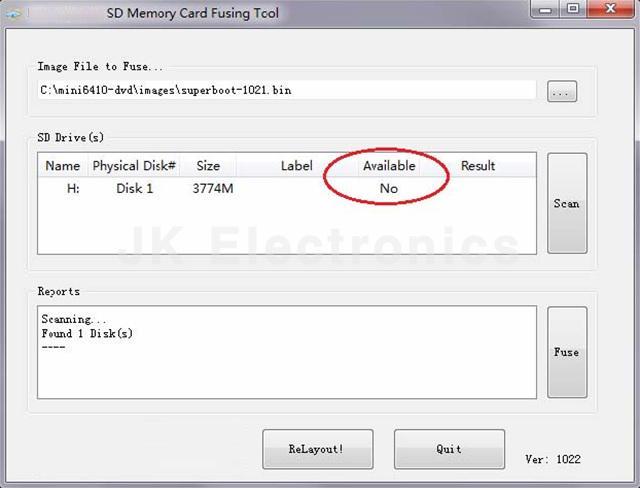
Step4. "Available" 이 "No"로 될 경우에는 "ReLayout"을 다시 한번 합니다.
SD메모리의 파티션 분할이 완료가 되면 다시 한번 "Scan" 을해서 사용가능한 SD 메모리 카드를 검색 합니다.
Step5. "Fuse" 버튼을 눌러서 Superboot를 Write 합니다.
Superboot가 SD메모리에 잘 Write 되었는지 확인하는 방법은 "1.1.1 Bootloader programming based on WindowsXP" 의 경우와 동일 합니다.
2 OS Install
2.1 Linux System install to NAND flash
OS를 인스톨하기전에 반드시 1.1 항목의 부트로더(Superboot)를 SD 메모리 카드에 퓨징이 되어 있어야 합니다. 만약 부트로더가 SD메모리 카드에 퓨징이 되어 있지 않다면먼저 1.1 Programming bootloader to the SD card 를 수행한 이후에 진행해 주시기 바랍니다.
개발보드는 공잘 출하시 Linux운영체제가 포팅 되어 있습니다.
Step1.
SD메모리 카드의 루트에 /images 폴더를 생성 합니다. 그리고 제공 CD의 Images 폴더안의 FriendlyARM.ini 파일을 SD메모리 카드의 "/images" 폴더에 복사 합니다.
텍스트 에디터에서 FriendlyARM.ini 파일을 리눅스 이미지 업데이트에 맞게 아래와 같이 수정 합니다.
* FriendlyARM.ini 파일의 내용( yaffs2 파일시스템으로 설치 )
|
CheckOneButton=No Action=InstallOS=Linux VerifyNandWrite=No low-format=No LCD-Mode = No Check CRC32=No Status Type = Beeper| LED ################### Linux #################### Linux-BootLoader = Superboot210.bin Linux-Kernel = Linux/zImage Linux-CommandLine = root=/dev/mtdblock4 console=ttySAC0,115200 init=/linuxrc Linux-RootFs-InstallImage = Linux/rootfs_qtopia_qt4.img |
Step2. SD 메모리의 /images/Linux 폴더를 생성 힙니다.
Step3. SD 메모리의 /images/Linux 폴더 안에 CD/images/Linux 폴더의 내용을 모두 복사 합니다.
SD메모리 카드의 디렉토리 구조를 아래와 같습니다.
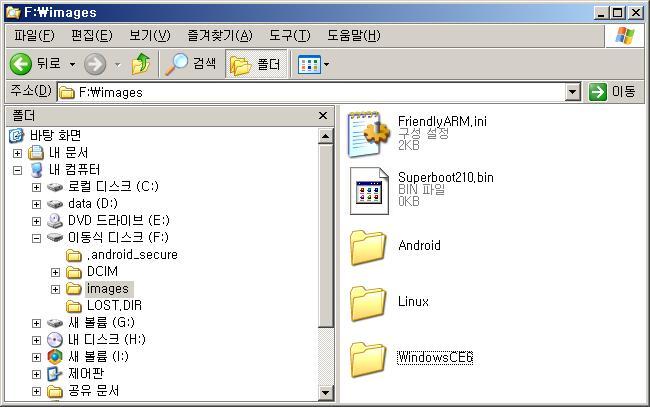
| 디렉토리, 파일 | Description |
| images\Superboot210.bin | Bootloader : SD메모리에도 퓨징이 되어있어야 합니다. |
| images\Linux\zImage | Linux 커널 |
| images\Linux\rootfs_qtopia_qt4.img | 리눅스 파일 시스템 |
| images\FriendlyARM.ini | OS 업데이트 설정 파일 |
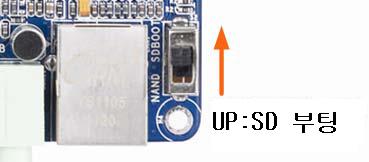
Step4. 개발보드에 SD메모리 카드를 삽입하고 S2(Ethernet 오르쪽 스위치 or Reset 버튼 아래 스위치)를 SDBOOT모드(Reset 버튼 쪽으로 올림)로 설정 합니다.
- SD 부트 모드
Step5. 개발보드의 전원을 인가하면 초기에 Buzzer소리와 함께 개발보드의 LCD에 OS가 업데이트 하는 프로그레스바가 진행이 됩니다.
Step6. 다운로드가 완료되면 LED1,2,3,4 이 깜빡입니다.
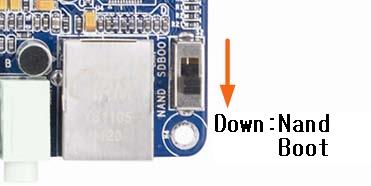
Step7. Switch2를 Nand 부트 모드로 전환하고 Reboot을 하면 업데이트된 OS 시스템이 실행 됩니다.
- NAND 부트 모드
LED4 ~ 1번이 동시에 점멸을 하며 부저가 빠르게 울리면 FriendlyARM.ini 파일의 설정과 디렉토리 구성이 잘못되었다는 것입니다.
Step8. 새로 업데이트된 OS가 처음에 부팅을 하면 LCD에 대한 Calibration 절차가 진행이 됩니다. Calibration를 하는 방법은 LCD화면의 "+" 자 안내 그림에 따라서 터치펜등을 이용해서 클릭을 하면 됩니다.
Calibration 데이터는 리눅스 시스템의 "/etc/pointercal" 파일에 저장이 됩니다.
또한 Calibration을 잘못하여 터치 좌표가 맞지 않을 경우에는 USB 마우스를 연결하여 QT GUI환경에서 Recalibration 을 실행해서 다시 교정을 하면 됩니다.
2.2 Android 2.3 System install to NAND flash
OS를 인스톨하기전에 반드시 1.1 항목의 부트로더(Superboot)를 SD 메모리 카드에 퓨징이 되어 있어야 합니다. 만약 부트로더가 SD메모리 카드에 퓨징이 되어 있지 않다면먼저 1.1 Programming bootloader to the SD card 를 수행한 이후에 진행해 주시기 바랍니다.
개발보드는 공잘 출하시 Linux운영체제가 포팅 되어 있습니다.
Step1.
SD메모리 카드의 루트에 /images 폴더를 생성 합니다. 그리고 제공 CD의 Images 폴더안의 FriendlyARM.ini 파일을 SD메모리 카드의 "/images" 폴더에 복사 합니다.
텍스트 에디터에서 FriendlyARM.ini 파일을 안드로이드 이미지 업데이트에 맞게 아래와 같이 수정 합니다.
* FriendlyARM.ini 파일의 내용 ( yaffs2 파일시스템으로 설치 )
|
|
Step2. SD 메모리의 /images/Android 폴더를 생성 힙니다.
Step3. SD 메모리의 /images/Android 폴더 안에 CD/images/Android 폴더의 내용을 모두 복사 합니다.
SD메모리 카드의 디렉토리 구조를 아래와 같습니다.
| 디렉토리, 파일 | Description |
| images\Superboot210.bin | Bootloader : SD메모리에도 퓨징이 되어있어야 합니다. |
| images\Android\zImage | Android 커널 |
| images\Android\rootfs_qtopia_qt4.img | Android 파일 시스템 |
| images\FriendlyARM.ini | OS 업데이트 설정 파일 |
Step4. 개발보드에 SD메모리 카드를 삽입하고 S2(Ethernet 오르쪽 스위치 or Reset 버튼 아래 스위치)를 SDBOOT모드(Reset 버튼 쪽으로 올림)로 설정 합니다.
- SD 부트 모드
Step5. 개발보드의 전원을 인가하면 초기에 Buzzer소리와 함께 개발보드의 LCD에 OS가 업데이트 하는 프로그레스바가 진행이 됩니다.
Step6. 다운로드가 완료되면 LED1,2,3,4 이 깜빡입니다.
Step7. Switch2를 Nand 부트 모드로 전환하고 Reboot을 하면 업데이트된 OS 시스템이 실행 됩니다.
- NAND 부트 모드
LED4 ~ 1번이 동시에 점멸을 하며 부저가 빠르게 울리면 FriendlyARM.ini 파일의 설정과 디렉토리 구성이 잘못되었다는 것입니다.
Step8. 새로 업데이트된 OS가 처음에 부팅을 하면 LCD에 대한 Calibration 절차가 진행이 됩니다. Calibration를 하는 방법은 LCD화면의 "+" 자 안내 그림에 따라서 터치펜등을 이용해서 클릭을 하면 됩니다.
또한 Calibration을 잘못하여 터치 좌표가 맞지 않을 경우에는 USB 마우스를 연결하여 Android GUI환경에서 Recalibration 을 실행해서 다시 교정을 하면 됩니다.
2.3 Android 4.0 System install to NAND flash
Android 4.0 OS 설치 방법은 Android 2.3 설치 방법과 동일 합니다. FriendlyARM.ini 파일에서 달라져야 하는 부분만 설명 하도록 하겠습니다.* FriendlyARM.ini 파일의 내용 ( yaffs2 파일시스템으로 설치 )
|
|
* Android 4.0 에서만 Android-CommandLine 에 lcd=S70 부분을 추가해 주어야 합니다.
* S70 부분에는 LCD의 종류에 따라서 H43(4.3" LCD),W50(5.0" LCD), S70(7.0" LCD),A70(7.0" LCD) 중에 1개를 선택 하시면 됩니다.
2.4 Windows CE 6.0 install to NAND flash
OS를 인스톨하기전에 반드시 1.1 항목의 부트로더(Superboot)를 SD 메모리 카드에 퓨징이 되어 있어야 합니다. 만약 부트로더가 SD메모리 카드에 퓨징이 되어 있지 않다면먼저 1.1 Programming bootloader to the SD card 를 수행한 이후에 진행해 주시기 바랍니다.
* Windows CE는 아직 초기 부팅이 완료된 이후 30초 정도가 지나면 Sleep 모드로 진입 후 빠져 나오지 못하는 버그가 있습니다.
USB 마우스나, 키보드 등이 연결되어 있으면 이러한 증상이 나타나지 않습니다. 이 문제는 조만간 업데이트 예정 입니다.
Step1.
SD메모리 카드의 루트에 /images 폴더를 생성 합니다. 그리고 제공 CD의 Images 폴더안의 FriendlyARM.ini 파일을 SD메모리 카드의 "/images" 폴더에 복사 합니다.
텍스트 에디터에서 FriendlyARM.ini 파일을 CE 이미지 업데이트에 맞게 아래와 같이 수정 합니다.
* FriendlyARM.ini 파일의 내용( yaffs2 파일시스템으로 설치 )
CheckOneButton=No Action=InstallOS=WindowsCE6 VerifyNandWrite=No low-format=Yes LCD-Mode = No LCD-Type = S70 Check CRC32=No Status Type = Beeper| LED ################### Windows CE6.0 #################### WindowsCE6-Bootloader = Superboot210.bin WindowsCE6-BootLogo = WindowsCE6\bootlogo.bmp WindowsCE6-InstallImage = WindowsCE6\NK.bin WindowsCE6-RunImage = WindowsCE6\NK.bin |
Step2. SD 메모리의 /images/WindowsCE6 폴더를 생성 힙니다.
Step3. SD 메모리의 /images/WindowsCE6 폴더 안에 CD/images/WindowsCE6 폴더의 내용을 모두 복사 합니다.
SD메모리 카드의 디렉토리 구조를 아래와 같습니다.
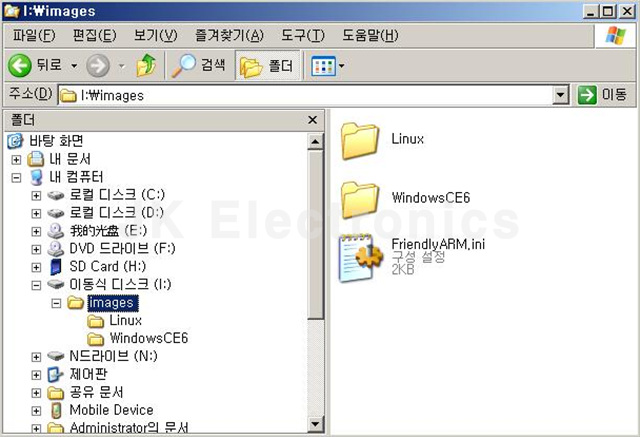
| 디렉토리, 파일 | Description |
| images\Superboot210.bin | Bootloader : SD메모리에도 퓨징이 되어있어야 합니다. |
| images\WindowsCE6\bootlogo.bmp | CE 부팅시 나타날 부팅 이미지 |
| images\WindowsCE6\NK.bin | CE6 파일 시스템 |
| images\FriendlyARM.ini | OS 업데이트 설정 파일 |
Step4. 개발보드에 SD메모리 카드를 삽입하고 S2(Ethernet 오르쪽 스위치 or Reset 버튼 아래 스위치)를 SDBOOT모드(Reset 버튼 쪽으로 올림)로 설정 합니다.
- SD 부트 모드
Step5. 개발보드의 전원을 인가하면 초기에 Buzzer소리와 함께 개발보드의 LCD에 OS가 업데이트 하는 프로그레스바가 진행이 됩니다.
Step6. 다운로드가 완료되면 LED1,2,3,4 이 깜빡입니다.
Step7. Switch2를 Nand 부트 모드로 전환하고 Reboot을 하면 업데이트된 OS 시스템이 실행 됩니다.
- NAND 부트 모드
LED4 ~ 1번이 동시에 점멸을 하며 부저가 빠르게 울리면 FriendlyARM.ini 파일의 설정과 디렉토리 구성이 잘못되었다는 것입니다.
3. Configuration FriendlyARM.ini
위의 간단한 운영체제 설치과정은 Superboot에서 모든 처리를 해주기 때문에 가능 합니다. 여기에서는 좀더 자세한 FriendlyARM.ini 파일의 설정에 대해서 설명 합니다.* FriendlyARM.ini 파일의 내용
|
# This line cannot be removed. By FriendlyARM (www.arm9.net) CheckOneButton=No Action=Install OS=Android VerifyNandWrite=No low-format=No LCD-Mode = No Check CRC32=No Status Type = Beeper| LED ################### Android 4.0.3 #################### ################### Android 2.3.1 #################### ################### Linux #################### ################### Windows CE6.0 #################### |
* 각 설정 항목에 대한 상세한 설명
| Item(Case insensitive) | Description |
| CheckOneButton | When
the "Yes", You need to press the power on or reset the board before any
key steps behind before it is implemented; When the "No"When turned on
or reset automatically after the steps behind the general volume can be
set when programming "No" The default is "No" USB다운로드 모드 or Superboot 메뉴로 진입하기 위해서는 "Yes" 로 설정해야 합니다. |
| Action |
Set the action to be performed, you can: Install / Run / Null, Representing: Install - InstalledNand Flash; Run - Directly from theSDCard operation Null - No Action; Set is empty, also said NULL The default is "Install" |
| OS |
Select
to install or run the system, can: Linux/Android;
Which UserBin Refers to the bare program or a single file image, such
as uCos2, Rt-Thread Etc. The default is "Android" |
| VerifyNandWrite |
When the "yes", The programming is complete, will perform validation, it will be more secure; When the "No", The programming is complete, does
not perform validation, this will be faster; The default is "No", Is generally not a problem. |
| LowFormat | NAND Flash for low-level format, in order to restore the state of the chip factory. The default is "Yes" |
| StatusType |
The programming process of the state prompted for
"LED", “Beeper" or The default is "LED | Beeper" |
| * Linux system installation | |
| Linux-BootLoader |
SpecifyvLinuxSystem
used Bootloader File image name such as: |
| Linux-Kernel |
Specify Linux used by the kernel file system image name Such as: |
| Linux-CommandLine |
Set Linux startup parameters, start or programmed for different ways to set different parameters. When yaffs2 file system, the recommended
parameters(Default) : Linux-CommandLine = root=/dev/mtdblock4 console=ttySAC0,115200 init=/linuxrc lcd=S70
When you need to SD directly running, default parameters can be retained
|
| Linux-RootFs-InstallImage |
Specify the installation Linux File system used by the image name, you can yaffs2/UBIFS Format. Our definition: "Img" Representative of the end of the image file yaffs2 Format; "Ubi" Representative of the end of the file UBIFS Format; "Ext3" Representative of the end of the image file EXT3 Format(Only fromSDCard operation) Such as:Linux-RootFs-InstallImage = Linux/root-qtopia-qt4.img (Default) |
| * Android system installation | |
| Android-BootLoader |
Specify Android system used bootloader file image
name Such as:Android-BootLoader = Superboot210.bin (Default) |
| Android-Kernel |
Specify Ubuntu used by the kernel file system
image name Such as:Android-BootLoader = Android/zImage (Default) |
| Android-CommandLine |
Set Android startup parameters, start or programmed for different ways to set different parameters. When yaffs2 file system, the recommended
parameters(Default): Android-CommandLine
= root=/dev/mtdblock4 console=ttySAC0,115200 init=/linuxrc androidboot.console=s3c2410_serial0 lcd=S70 When you need to SD directly running, default parameters can be retained |
| Android-RootFs-InstallImage |
Specify the installation Android file system used by the image name, you can yaffs2/UBIFS format. Our definition: "Img" Representative of the end of the image file yaffs2 format; "Ubi" Representative of the end of the file UBIFS format; "Ext3" Representative of the end of the image file
EXT3 format(Only from SD Card operation) Such as:Android-RootFs-InstallImage = Android/rootfs_android.img (Default) |
| * Windows CE system installation | |
| WindowsCE6-Bootloader | Specify WindowsCE6 System used bootloader file image name Such as:WindowsCE6-Bootloader = Superboot210.bin (Default) |
| WindowsCE6-BootLogo | Specify WindowsCE6 splash screen file name used will be burned write Nand Flash, The file is ordinary bmp format can be up to 2M Such as:WindowsCE6-BootLogo = WinowsCE6\BootLogo.bmp (Default) |
| WindowsCE6-InstallImage | Specify the installation WindowsCE6 image used by the kernel file name, the need for NK.bin format Such as:WindowsCE6-InstallImage = WindowsCE6\NK.bin (Default) |
| WindowsCE6-RunImage | Designated from SD Card operation WindowsCE used when the file system image, the need for Nk.bin format. Such as:WindowsCE6-RunImage = WindowsCE6\NK.bin (Default) |
Note : ini 파일안에 주석을 넣고 싶으면 "#" 문자 이후에 넣으면 되고, 파일의 내용중 첫번째 라인의 #This line cannot be removed. By FriendlyARM (www.arm9.net) 부분은 삭제하거나 수정 마지막 ")" 문자 이후에 어떠한 문자나 공백도 있으면 안됩니다.