이 매뉴얼은 JK전자(JK Electronics) 에 의해서 수정, 작성 되었고 소유권 또한
JK전자(JK Electronics)의 것입니다. 소유권자의 허가를 받지 않고 무단으로 수정, 삭제하거나 배포 할 수 없습니다.
ARM JTAG Command 상세 가이드
* Update history
- 2012.3.26 : 초기 Release
1. Introduction
2 Commnand : Target unrelated
2.1 Command [;]
2.2 Command [print]
2.3 Command [wait]
2.4 Command [time]
2.5 Command [check]
2.5.1 check.show
2.5.2 check.data
2.5.3 check.bit
2.6 Example of Command Target unrelated
3 Commnand : Target related
3.1 Command [target]
3.1.1 target.status.jtag
3.1.2 target.status.core
3.1.3 target.status.mode
3.1.4 target.status
3.1.5 target.stop
3.1.6 target.run
3.1.7 Example of Command [target]
3.2 Command [reg]
3.2.1 reg.r<number>.read
3.2.2 reg.pc.read
3.2.3 reg.cpsr.read
3.2.4 reg.spsr.read
3.2.5 reg.all.read
3.2.6 reg.r<number>.write
3.2.7 reg.r<number>.write.before
3.2.8 reg.pc.write
3.2.9 reg.pc.write.before
3.2.10 reg.cpsr.write
3.2.11 reg.spsr.write
3.2.12 Example of Command [reg]
3.3 Command [mem]
3.3.1 mem.read
3.3.2 mem.write
3.3.3 mem.load
3.3.4 Example of Command [mem]
3.4 Command [bp]
3.4.1 bp.set.symbol
3.5 Command [flash]
3.5.1 flash.agent
3.5.2 flash.program
3.5.3 flash.erase
3.6 Command [cp]
3.6.1 cp.mmu.read
3.6.2 cp.mmu.off
3.6.3 cp.cp15.read
3.6.4 cp.cp15.write
3.6.5 Example of Command [cp]
3.7 Command [execute]
3.7.1 execute
3.7.2 Example of Command [execute]
1. Introduction
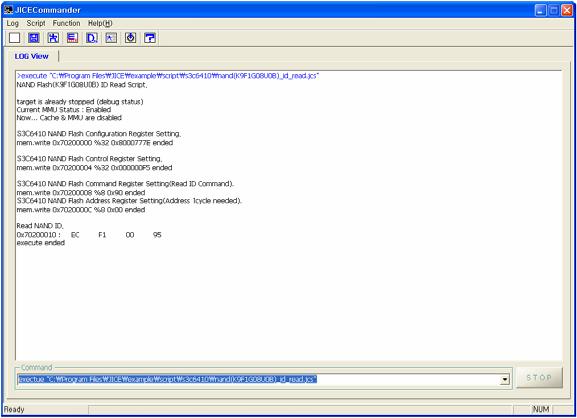
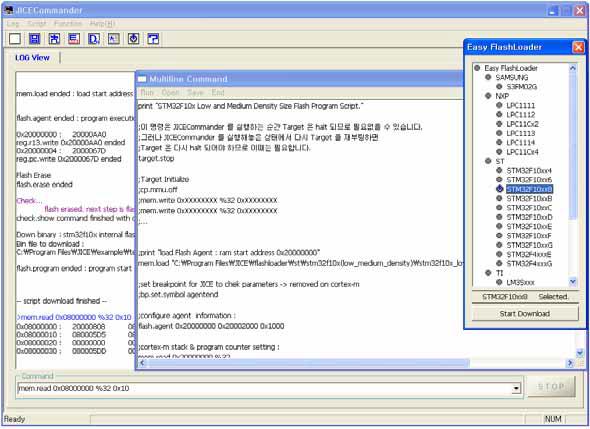
JICE 는 Target 을 제어할 유용하고 직관적인 명령어를 제공합니다. JICECommander Picture 1-0 는 이 JICE 명령어를 실행할 수 있는 Tool 입니다.
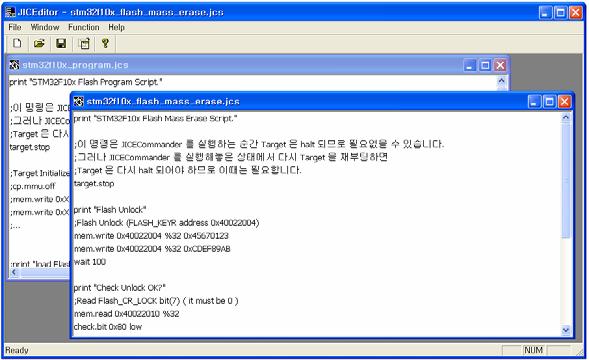
JICEditor Picture 1-1 는 이 JICE 명령어를 작성할 수 있는 에디터 Tool 입니다.
JICECommander 와 JICEditor 를 통해 아래와 같은 일을 수행할 수 있습니다.
Test your target connection.
Control your target.
Read/Write Memory.
Flash Download.
Flash Agent Debugging.
…
이 문서는 JICE 가 제공하는 명령어에 대해서 설명하고 JICECommander를 이용하여 이 명령어를 실행하는 실제 예를 설명하기 위해서 만들어졌습니다.
JICECommander
JICEditor
2 Command : Target unrelated
2.1 Command [;]
Format :
;
Description :
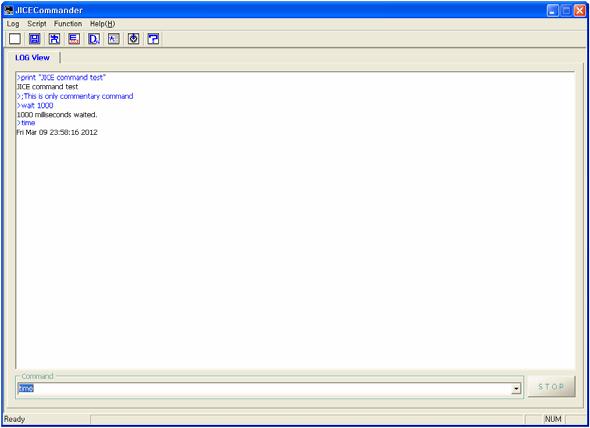
주석 사용 시 이용하는 명령어 입니다. JICECommander 에서는 아무런 일도 하지 않습니다. Scirpt 상에서 주석을 달 때 사용합니다.
Example :
*.jcs script 파일에서 이 명령어의 사용 예는 아래와 같습니다.
;;;;;;;;;;;;;;;;;;;;;;;;;;;;;;;;;;;;;;;;;;;;;;;;;;;;;;;;;;;;;;;;;;;;;
;;Script made by JK Electronics-------------------
; Target test 2010.01.01---------------
;;;;;;;;;;;;;;;;;;;;;;;;;;;;;;;;;;;;;;;;;;;;;;;;;;;;;;;;;;;;;;;;;;;;;
2.2 Command [print]
Format :
print “XXXX”
Description :
JICECommander LOG 창에 XXXX 를 찍어 그대로 보여줍니다. print 명령어와 “XXXX” 사이에는 1 칸의 space bar 가 필요합니다.
Example :
명령어의 사용 예는 아래와 같습니다.
print "###### S3C2413 ID Read Script ######"
2.3 Command [wait]
Format :
wait <number>
Description :
number milliseconds 시간동안 wait 하는 명령어 입니다. 이 시간동안 JICEComamnder 는 아무런 일도 하지 않게 됩니다.
보통은 Target 의 Register 를 Control(Write) 한 후 얼마간 기다려야 할 때 사용합니다.
wait 명령어와 <number> 사이에는 1 칸의 space bar 가 필요합니다.
Example :
명령어의 사용 예는 아래와 같습니다.
wait 4000
2.4 Command [time]
Format :
time
Description :
현재 시간을 보여줍니다.
Example :
명령어의 사용 예는 아래와 같습니다.
time
2.5 Command [check]
2.5.1 Command [check.show]
Format :
check.show “XXXX”
Description :
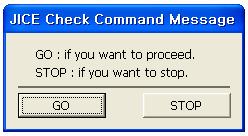
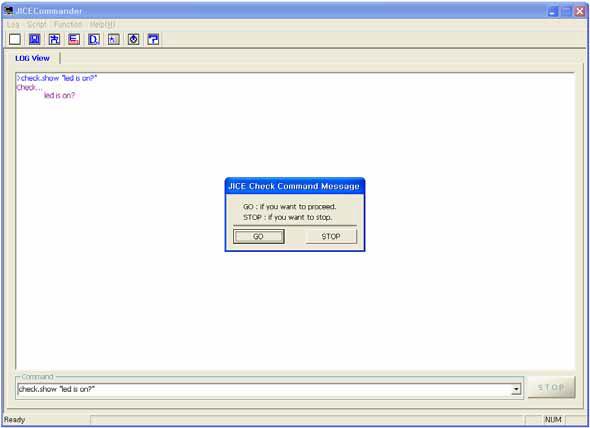
이 명령을 만나면 JICE LOG View 창에는 “XXXX” 내용을 보여주면서 현재 진행 중인 스크립트를 멈추고 다이얼로그 박스를 뛰우게 됩니다.
다이얼로그 박스에서 GO 를 선택하면 진행 중이던 스크립트를 계속 실행하며,STOP 을 선택하면 더 이상 스크립트를 실행하지 않고 마치게 됩니다.
Example :
명령어의 사용 예는 아래와 같습니다.
check.show “ALL LED OFF”
2.5.2 Command [check.data]
Format :
check.data <value-hex number>
Description :
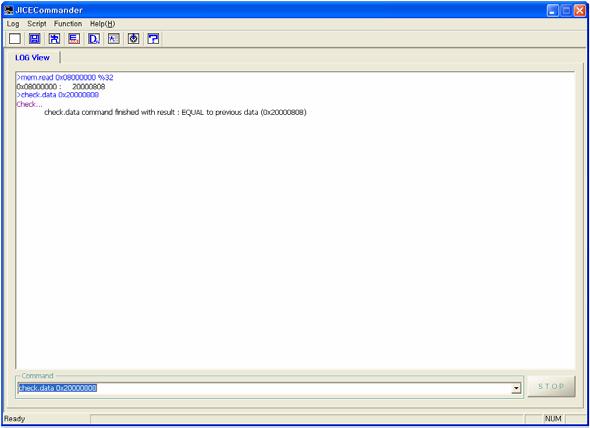
이 명령을 만나면 이전에 사용되었던 data 와 <value-hex number> 값을 비교하여 동일하면 진행 중이던 스크립트를 계속 실행 하고, 동일하지 않으면 더 이상 스크립트를 실행하지 않고 마치게 됩니다. 비교하게 되는 이전 data 는 mem.read 명령어를 통해서 read 한 data 중 가장 최근의 값 입니다.
Example :
명령어의 사용 예는 아래와 같습니다.
check.data 0x5F
2.5.3 Command [check.bit]
Format :
check.bit <bit field-hex number> high/low
Description :
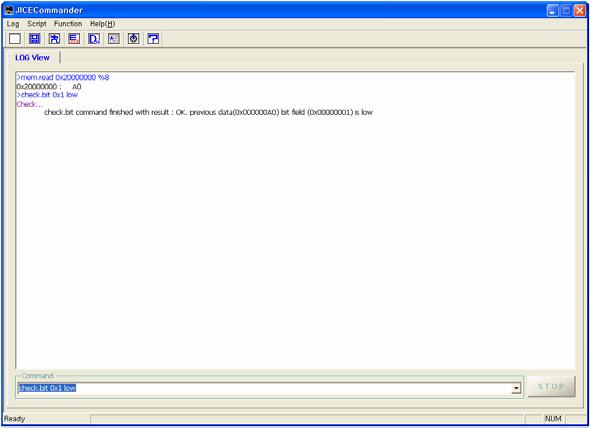
이 명령을 만나면 이전에 사용되었던 data 와 <bit field-hex number> 값을 비교합니다. high 명령이면 bit field 값이 모두 high 이어야 진행 중이던 스크립트를 계속 실행합니다.
마찬가지로 low 명령이면 bit field 값이 모두 low 이어야 진행 중이던 스크립터를 계속 실행합니다.
그렇지 않으면 더 이상 스크립트를 실행하지 않고 마치게 됩니다. 비교하게 되는 이전 data 는 mem.read 명령어를 통해서 read 한 data 중 마지막의 것 입니다.
Example :
명령어의 사용 예는 아래와 같습니다.
check.bit 0x1 low
2.6 Example of Command Target unrelated
3 Command : Target related
3.1 Command [target]
3.1.1 Command [target.status.jtag]
Format :
target.status.jtag
Description :
JICE 와 Target 사이의 JTAG 연결에 문제가 없는지 보여줍니다.
Example :
명령어의 사용 예는 아래와 같습니다.
target.status.jtag
3.1.2 Command [target.status.core]
Format :
target.status.core
Description :
Target 이 stopped (debug status) 상태인지 또는 running (normal status) 상태인지 를 확인합니다.
Example :
명령어의 사용 예는 아래와 같습니다.
target.status.core
3.1.3 Command [target.status.mode]
Format :
target.status.mode
Description :
Target 이 arm (32bit) mode 인지 또는 thumb (16bit) mode 인지를 확인합니다.
Example :
명령어의 사용 예는 아래와 같습니다.
target.status.mode
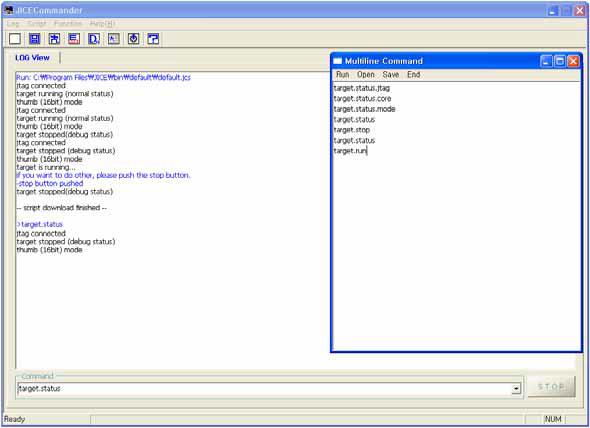
3.1.4 Command [target.status]
Format :
target.status
Description :
이 명령은 아래 3개의 명령어를 한번에 실행합니다.
target.status.jtag
target.status.core
target.status.mode
Example :
명령어의 사용 예는 아래와 같습니다.
target.status
3.1.5 Command [target.stop]
Format :
target.stop
Description :
Target 을 stop (debug status) 시키고 Target 이 제대로 stop 되었는지 다시 확인합니다.
Example :
명령어의 사용 예는 아래와 같습니다.
target.stop
3.1.6 Command [target.run]
Format :
target.run
Description :
Target 을 현재 stop 된 pc 에서부터 다시 run 시킵니다.
Example :
명령어의 사용 예는 아래와 같습니다.
target.run
Notice :
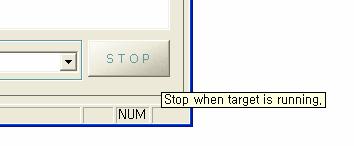
이 명령어를 실행하면 target 은 run 상태가 되고 ARMJTAG Commander 는 계속 running 중인 target 을 감시하게 되어서 다른 명령어를 실행 할 수 없게 됩니다.
따라서 다른 명령어를 실행하기 위해서는 ARMJTAG Commander 에서 아래 STOP 버튼을 눌러서 target 을 다시 STOP 시킨 후 진행하여야 합니다.
3.1.7 Example of Command [target]
3.2 Command [reg]
3.2.1 Command [reg.r<number>.read]
Format :
reg.r<number>.read
Description :
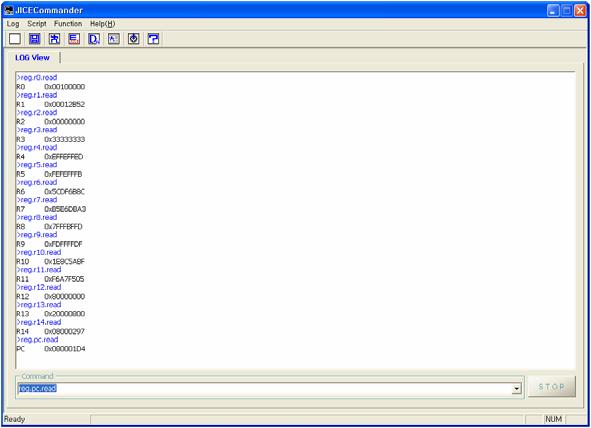
register r0, r1, r2, …,r14 읽기 명령어 입니다.
number : 10진수 형식이어야 합니다.
0, 1, 2, 3, 4, …, 14 중 하나의 숫자 이어야 합니다.
Example :
명령어의 사용 예는 아래와 같습니다.
reg.r0.read
3.2.2 Command [reg.pc.read]
Format :
reg.pc.read
Description :
register pc 읽기 명령어 입니다.
Example :
명령어의 사용 예는 아래와 같습니다.
reg.pc.read
3.2.3 Command [reg.cpsr.read]
Format :
reg.cpsr.read
Description :
register cpsr 읽기 명령어 입니다.
Example :
명령어의 사용 예는 아래와 같습니다.
reg.cpsr.read
3.2.4 Command [reg.spsr.read]
Format :
reg.spsr.read
Description :
register spsr 읽기 명령어 입니다.
Example :
명령어의 사용 예는 아래와 같습니다.
reg.spsr.read
3.2.5 Command [reg.all.read]
Format :
reg.all.read
Description :
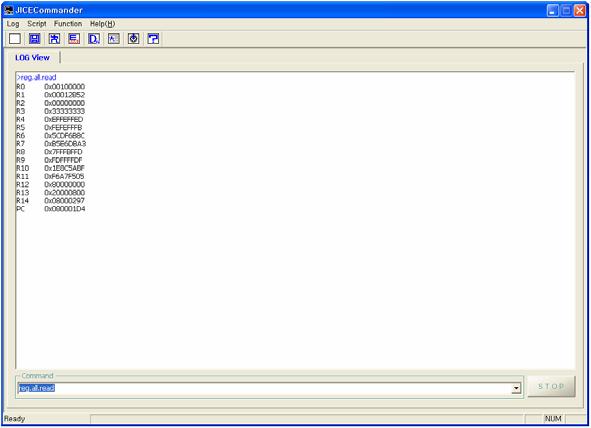
register r0, r1, r2, …, r14, pc, cpsr, spsr 모두 읽기 명령어 입니다.
Example :
명령어의 사용 예는 아래와 같습니다.
reg.all.read
3.2.6 Command [reg.r<number>.write]
Format :
reg.r<number>.write <value-hex number>
Description :
register r0, r1, r2, …,r14 쓰기 명령어 입니다.
write 와 <value-hex number> 사이에는 1 칸의 space bar 가 필요합니다.
number : 10진수 형식이어야 합니다.
0, 1, 2, 3, 4, …, 14 중 하나의 숫자 이어야 합니다.
value-hex number : 0x 로 시작하는 16진수 형식이어야 합니다. 쓰고자 하는 값을 의미합니다.
Example :
명령어의 사용 예는 아래와 같습니다.
reg.r0.write 0x20002000
3.2.7 Command [reg.r<number>.write.before]
Format :
reg.r<number>.write.before
Description :
register r0, r1, r2, …,r14 쓰기 명령어 입니다.
write 하는 value 는 이전에 mem.read 명령어를 통해서 read 한 data 중 가장 최근의 값 입니다.
Example :
명령어의 사용 예는 아래와 같습니다.
reg.r13.write.before
3.2.8 Command [reg.pc.write]
Format :
reg.pc.write <value-hex number>
Description :
register pc 쓰기 명령어 입니다.
write 와 <value-hex number> 사이에는 1 칸의 space bar 가 필요합니다.
value-hex number : 0x 로 시작하는 16진수 형식이어야 합니다. 쓰고자 하는 값을 의미합니다.
Example :
명령어의 사용 예는 아래와 같습니다.
reg.pc.write 0x20002000
3.2.9 Command [reg.pc.write.before]
Format :
reg.pc.write.before
Description :
register pc 쓰기 명령어 입니다.
write 하는 value 는 이전에 mem.read 명령어를 통해서 read 한 data 중 가장 최근의 값 입니다.
Example :
명령어의 사용 예는 아래와 같습니다.
reg.pc.write.before
3.2.10 Command [reg.cpsr.write]
Format :
reg.cpsr.write <value-hex number>
Description :
register cpsr 쓰기 명령어 입니다.
write 와 <value-hex number> 사이에는 1 칸의 space bar 가 필요합니다.
value-hex number : 0x 로 시작하는 16진수 형식이어야 합니다. 쓰고자 하는 값을 의미합니다.
Example :
명령어의 사용 예는 아래와 같습니다.
reg.cpsr.write 0x20002000
3.2.11 Command [reg.spsr.write]
Format :
reg.spsr.write <value-hex number>
Description :
register spsr 쓰기 명령어 입니다.
write 와 <value-hex number> 사이에는 1 칸의 space bar 가 필요합니다.
value-hex number : 0x 로 시작하는 16진수 형식이어야 합니다. 쓰고자 하는 값을 의미합니다.
Example :
명령어의 사용 예는 아래와 같습니다.
reg.spsr.write 0x20002000
3.2.12 Example of Command [reg]
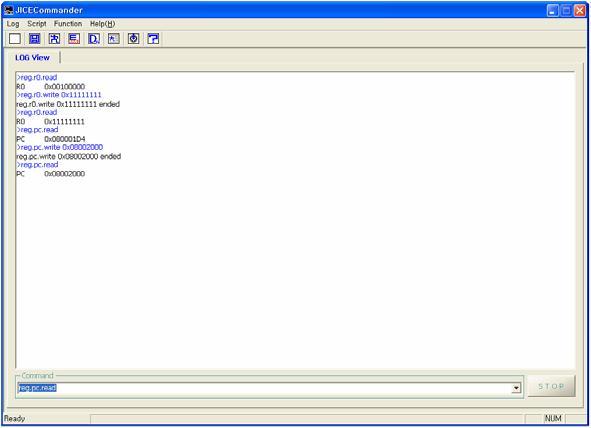
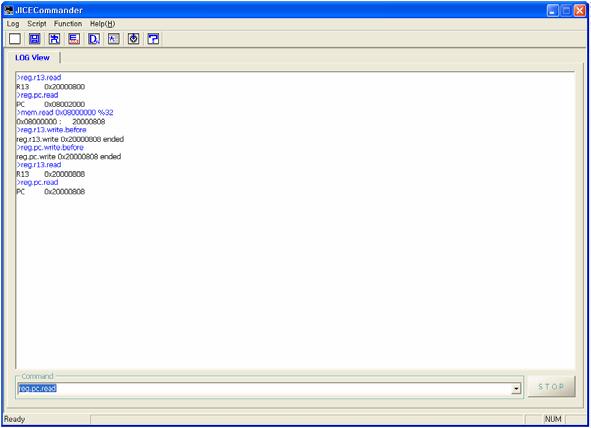
3.3 Command [mem]
3.3.1 Command [mem.read]
Format :
mem.read <address-hex number> %<format-32,16,8> [<number of times-hex number>] [repeat,bin]
Description :
Memory 읽기 명령어 입니다.
address-hex number : 0x 로 시작하는 16진수 형식이어야 합니다.
MMU가 disasble 되어 있으면 PA(Physical address)로 accsss.
MMU가 enable 되어 있으면 VA(Virtual address)로 accsss.
format-32,16,8 : 32 또는 16 또는 8 중 하나 이어야 합니다.
%32 -> data size 32bit.
%16 -> data size 16bit.
%8 -> data size 8bit.
number of times-hex number : 0x 로 시작하는 16진수 형식이어야 합니다. address 를 증가시키며 몇 번을 읽은 것인가를 결정합니다.
repeat : repeat 를 붙이면 address 를 증가시키지 않고 동일한 address 를 number of times 만큼 읽습니다. NAND Flash read 시 이용하면 유용합니다.
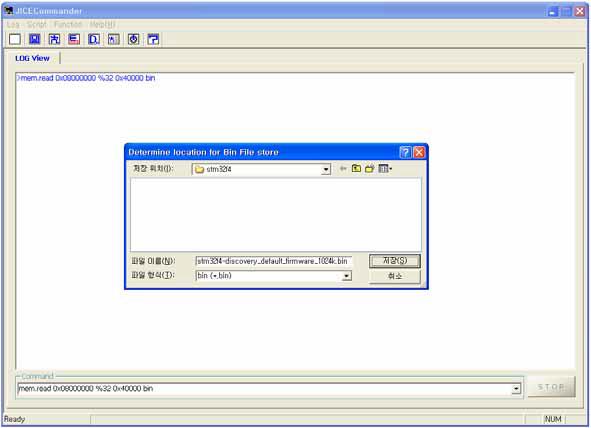
bin : bin 을 붙이면 read 한 값을 bin 파일 포멧으로 저장합니다. Memory dump 값을 bin 파일 형태로 backup 해놓고 싶을 때 이용하면 됩니다.
Example :
명령어의 사용 예는 아래와 같습니다.
mem.read 0x00200000 %32
--> read 32bit(4Byte) from address 0x00200000, 1 time.
mem.read 0x00200000 %32 0x1
--> read 32bit(4Byte) from address 0x00200000, 1time.
--> mem.read 0x00200000 %32 와 mem.read 0x00200000 %32 0x1 는 동일한 결과를 보여줍니다.
즉 마지막에 number of times-hex number 가 붙지 않으면 기본적으로 1번 읽기를 수행합니다.
mem.read 0x00200000 %32 0x3
--> read 32bit(4Byte) 3 times increasing address
--> address : 0x00200000, 0x00200004, 0x00200008
mem.read 0x00200000 %16 0x3
--> read 16bit(2Byte) 3 times increasing address
--> address : 0x00200000, 0x00200002, 0x00200004
mem.read 0x00200000 %8 0x11
--> read 8bit(1Byte) 11 times increasing address
--> address : 0x00200000, 0x00200001, 0x00200002, … ,0x00200010
mem.read 0x00200000 %8 0x11 repeat
--> read 8bit(1Byte) 11 times not increasing address(same address)
--> address : 0x00200000, 0x00200000, 0x00200000, … ,0x00200000
mem.read 0x08000000 %8 0x100000 bin
--> read 8bit(1Byte) 0x100000 times increasing address and save as bin file format
3.3.2 Command [mem.write]
Format :
mem.write <address-hex number> %<format-32,16,8> <value-hex number>
Description :
Memory 쓰기 명령어 입니다.
address-hex number : 0x 로 시작하는 16진수 형식이어야 합니다.
MMU가 disasble 되어 있으면 PA(Physical address)로 accsss.
MMU가 enable 되어 있으면 VA(Virtual address)로 accsss.
<format-32,16,8> : 32 또는 16 또는 8 중 하나 이어야 합니다.
%32 -> data size 32bit.
%16 -> data size 16bit.
%8 -> data size 8bit.
<value-hex number> : 0x 로 시작하는 16진수 형식이어야 합니다. 쓰고자 하는 값을 의미합니다.
Example :
명령어의 사용 예는 아래와 같습니다.
mem.write 0x00200000 %32 0x12345678
--> write 32bit(4Byte) value(0x12345678) to address 0x00200000
mem.write 0x00200000 %16 0x1234
--> write 16bit(2Byte) value(0x1234) to address 0x00200000
mem.write 0x00200000 %8 0x12
--> write 8bit(1Byte) value(0x12) to address 0x00200000
3.3.3 Command [mem.load]
Format :
mem.load “file location-bin file format” <address-hex number>
Description :
Memory Load 명령어 입니다. 실제로는 Flashloader(FlashAgent) bin 파일을 타겟의 메모리에 로드 하는 용도로 주로 사용 합니다.
file location-bin file format : RAM 상에 Load 할 bin 파일의 위치입니다. “ 로 시작하고 ”로 마쳐야 합니다.
<address-hex number> : Load 될 bin 파일의 RAM 의 start address 입니다. 0x 로 시작하는 16진수 형식이어야 합니다.
MMU가 disasble 되어 있으면 PA(Physical address)로 accsss.
MMU가 enable 되어 있더라도 PA(Physical address)로 accsss.
Example :
명령어의 사용 예는 아래와 같습니다.
mem.load “C:\Binary\stm32f103_flash_agent.bin” 0x20000000
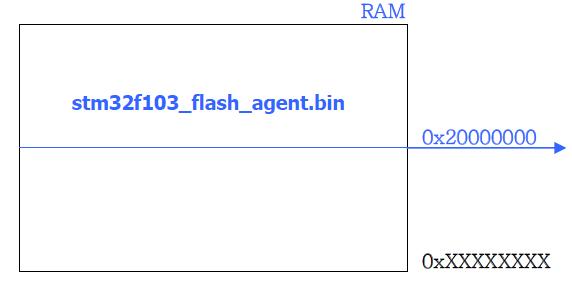
Notice :
아래의 조합으로 RAM 에 bin 파일을 Load 하고 실행할 수 있습니다.
;casche&mmu off (cashe 를 가진 system 에서 enable 되었을 경우 필요함.)
mem.load "D:\LN2413SBC\9. Binary Image\Bootstrap\Bootstrap_2413.bin" 0x00000000
reg.pc.write 0x00000000
target.run
3.3.4 Example of Command [mem]
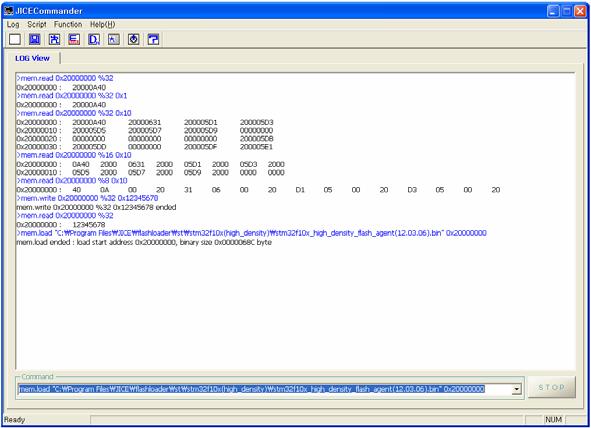
3.4 Command [bp]
3.4.1 Command [bp.set.symbol]
Format :
bp.set.symbol agentend
Description :
HW breakpoint 를 code 상에서 symbol(agentend) 이 있는 address 에 놓아 설정합니다.
Flash agent 와 상호 동작해야 합니다. (보통은 Flash agent 에서만 사용합니다.)
Example :
명령어의 사용 예는 아래와 같습니다.
bp.set.symbol agentend
Notice :
1) 이 명령어 사용시는 인터워킹(ARM/Thumb 모드간 변화)을 사용하지 말고 ARM(32bit) mode 만을 사용하십시요.
2) 이 명령어는 코드에서 한번만 사용하십시요.
3) Cortex-M 코어에서는 이 명령어를 사용하지 마십시요.
Cortex-M 코어는 별도로 Assembly 작성이 필요 없으므로 이 명령어를 사용할 필요가 없습니다. 또한 Flash agent 작성 시에도 이 명령이 필요없습니다.
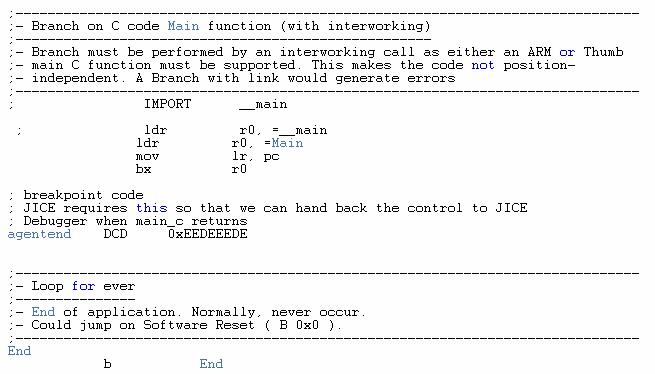
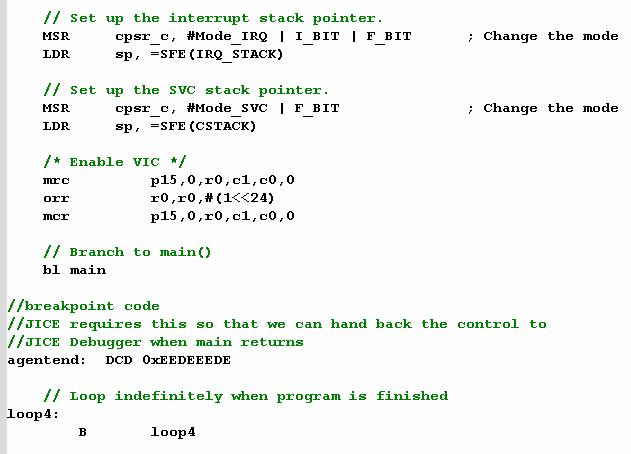
4) Flash agent 소스에는 아래와 같이 사용해야 합니다. 즉
agentend DCD 0xEEDEEEDE (ARM ADS 컴파일러에서 사용 시)
agentend: DCD 0xEEDEEEDE (IAR EWARM 컴파일러에서 사용 시)
가 사용되어야 합니다.
● ARM ADS 컴파일러 사용 시 :
● IAR EWARM 컴파일러 사용 시 :
3.5 Command [flash]
3.5.1 Command [flash.agent]
Format :
flash.agent <address1-hex number> <address2-hex number> <valuehex number>
Description :
Flash agent 정보를 설정합니다.
<address1-hex number> : 0x 로 시작하는 16진수 형식이어야 합니다. RAM 상에 Load 된 Flash agent 바이너리의 start address 를 기입합니다.
Flash agent 바이너리를 RAM 상에 Load 할 때 mem.load 명령을 사용하므로 mem.load 명령에 사용된 address 값과 동일한 값을 사용하면 됩니다.
<address2-hex number> : 0x 로 시작하는 16진수 형식이어야 합니다. Flash agent 의 parameter 영역의 start address 를 기입합니다.
<value-hex number> : 0x 로 시작하는 16진수 형식이어야 합니다. RAM 상의 flash buffer size 를 기입합니다.
(buffer size of the user flash image to be loaded in ram)
Example :
명령어의 사용 예는 아래와 같습니다.
flash.agent 0x00200000 0x00202000 0x1000
Notice :
Reference document : ARMJTAGFlash Fusing and Agent Development Guide
3.5.2 Command [flash.program]
Format :
flash.program “file location-bin file format” <address-hex number>
Description :
flash memory fusing 명령어 입니다. flash agent 와 상호 동작해야 합니다.
file location-bin file format : Flash 에 Fusing 할 bin 파일의 위치입니다. “ 로 시작하고 ”로 마쳐야 합니다.
<address-hex number> : Fusing 될 bin 파일의 Flash 의 start address 입니다. 0x 로 시작하는 16진수 형식이어야 합니다.
Example :
명령어의 사용 예는 아래와 같습니다.
flash.program “C:\Binary\stm32f103.bin” 0x08000000
3.5.3 Command [flash.erase]
Format :
flash.erase
Description :
flash memory erase 명령어 입니다.
flash agent 와 상호 동작해야 합니다.
Example :
명령어의 사용 예는 아래와 같습니다.
flash.erase
3.6 Command [cp]
3.6.1 Command [cp.mmu.read]
Format :
cp.mmu.read
Description :
MMU 상태 읽기 명령어 입니다.
Example :
명령어의 사용 예는 아래와 같습니다.
cp.mmu.read
3.6.2 Command [cp.mmu.off]
Format :
cp.mmu.off
Description :
MMU 를 Disable 합니다.
Example :
명령어의 사용 예는 아래와 같습니다.
cp.mmu.off
Notice :
Memory access 시 ARM CPU 의 현재 특성을 그대로 유지 하면서 접근합니다. 따라서 MMU 가 enable 되어 있으면 memory access 는 Virtual address로 접근합니다.
Memory access 명령 시 아래를 주의해서 기억하십시요.
mem.read :
MMU가 disasble 되어 있으면 PA(Physical address)로 accsss.
MMU가 enable 되어 있으면 VA(Virtual address)로 accsss.
mem.write :
MMU가 disasble 되어 있으면 PA(Physical address)로 accsss.
MMU가 enable 되어 있으면 VA(Virtual address)로 accsss.
mem.load :
MMU가 disasble 되어 있으면 PA(Physical address)로 accsss.
MMU가 enable 되어 있더라도 PA(Physical address)로 accsss.
따라서 MMU가 enable 되어 있고 mem.read 또는 mem.write 명령어를 사용하고자 할 때 만약 Physical address 로 접근해야 할 경우
cp.mmu.off 명령어를 사용 후 mem.read 또는 mem.write 명령어를 사용해야 합니다.
3.6.3 Command [cp.cp15.read]
Format :
cp.cp15.read <operation code-hex number>
Description :
Coprocessor cp15 상태 읽기 명령어 입니다.
<operation code-hex number> : cp15 register, operation 의 값 입니다. 0x 로 시작하는 16진수 형식이어야 하고 4Byte 크기 입니다.
CRn, Op1, CRm, Op2 순서로 위치하며 각각은 1Byte 크기를 가집니다.
Example :
명령어의 사용 예는 아래와 같습니다.
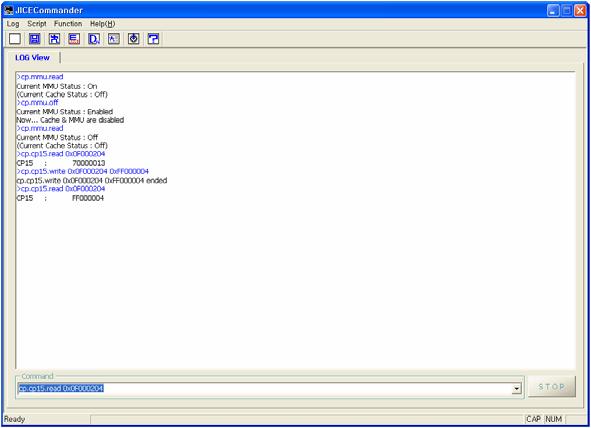
cp.cp15.read 0x0F000204
위 예는 ARM1176JZF-S 에서
C15 Peripheral Port Memory Remap
CP15 Coprocessor Register 를 읽는 예 입니다.
이때의 <operation code-hex number> 는 0x0F000204 입니다. ARM1176JZF-S TRM 에 이 Register 에 대한 설명이 있습니다.
operation code 0x0F000204 는 아래의 조합과 순서로 만들어진 것 입니다.
CRn : c15 -> 0x0F
Op1 : 0 -> 0x00
CRm : c2 -> 0x02
Op2 : 4 -> 0x04
3.6.4 Command [cp.cp15.write]
Format :
cp.cp15.write <operation code-hex number> <cp value-hex number>
Description :
Coprocessor cp15 쓰기 명령어 입니다.
<operation code-hex number> : cp15 register, operation 의 값 입니다. 0x 로 시작하는 16진수 형식이어야 하고 4Byte 크기 입니다.
CRn, Op1, CRm, Op2 순서로 위치하며 각각은 1Byte 크기를 가집니다.
<cp value-hex number> : 0x 로 시작하는 16진수 형식이어야 합니다. 쓰고자 하는 값을 의미합니다.
Example :
명령어의 사용 예는 아래와 같습니다.
cp.cp15.write 0x0F000204 0x70000013
3.6.5 Example of Command [cp]
3.7 Command [execute]
3.7.1 Command [execute]
Format :
execute “file location-jcs file format”
Description :
jcs(ARMJTAG Command Script) script file 을 실행합니다.
file location-jcs file format : jcs file 위치입니다. “ 로 시작하고 ”로 마쳐야 합니다.
Example :
명령어의 사용 예는 아래와 같습니다.
execute “D:\script\at91script.jcs”
3.7.2 Example of Command [execute]